Drupal Custom Site Search with Search API

Updated February 2026
This article outlines foundational implementation patterns for Drupal search configuration. While the core concepts remain relevant, tooling and best practices continue to evolve across Drupal versions and enterprise environments.
For organizations evaluating search relevance, accessibility, and long-term governance across complex Drupal sites, learn more about our Drupal development services.

Next, we’ll want to add the Search API contrib module. From your site’s root folder in the command line, run: composer require drupal/search_api (assuming you’re using a Composer-based build) to download the module and its dependencies and then install it.
If you’re not using Composer, manually download the module and install or use the /admin/modules/install UI.
You’ll also want to install the Database Search submodule at this time. This will allow Search API to search the site’s database just like core Search does.
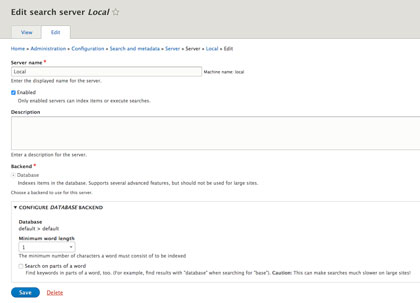
The first thing we need to do to get Search API up and running is to create a search server. This has nothing to do with your website’s host server and is completely internal and only used to hold the search indexes.
Go to /admin/config/search/search-api and follow these steps:
Click Add Server
Name it Local (or something specific to the indexes that will be using it).
Check the box to enable it.
Make sure the Backend is set to Database (it should be if you have the Database Search submodule enabled).
Configure the Database Backend. We usually set the minimum word length to 3 and do not search on parts of a word.

In order for Search API to work, it needs to know what content to look at and catalog. This means we need to configure a search index.
Unlike core Drupal Search, which concentrates on node entities, Search API allows you to choose to include any entity recognizable to Drupal. You can configure one index that will keep track of all entities, or you can create different indexes for different entities and use different views to allow specific searches for certain content. A prime example would be a university with custom searches set up per department.
Go to /admin/config/search/search-api and follow these steps:
Name it something descriptive based on what it will be used for (i.e. Content).
Select the datasources (we’ll just use Content for the sake of simplicity).
Configure the datasources how you want them. You can choose to include and exclude different types for each datasource entity.
Choose the server you just created.
Enable the server.
Index options allows you to choose to index items immediately. New nodes and entities will be added to the search index immediately instead of waiting for cron to run.
Index options also let you set the number of entities to index per cron run. We keep the cron batch size to the default of 50 since we are adding new entities when they are created.
Pro Tip:
If you’re bulk adding a bunch of content through a migration, wait until after the migration to use the Index immediately setting—or if you have a site with dozens of important pages being added daily, don’t use that setting at all because it will be a performance hit trying to keep up.
Now that we’ve got an index created, defined some datasources, and plugged it into the server; we can define which fields from those datasources we want to use for indexing.
You can define fields for each datasource, but not each type within the datasource. For example, if you had a content type that had a summary field, you can add the field to be indexed and it will just be ignored for the content types that don’t have it.
We usually go with indexing our main node fields—title, subheader, and body. These are the fields most likely to contain relevant search keywords.
You can define the index field type for each field and decide the boost value to give some fields more relevance than others. We always boost the node title the most and assign the rest of the boost values based on the importance and relevance of the content to the node.

Pro Tip:
Make sure that every field you have listed here has its type set to Fulltext—no matter what the actual field type or formatter is on your content types. Since we are going to be setting up a custom views search page later and using the Fulltext keyword filter, only fields listed as Fulltext here will be available in that filter.
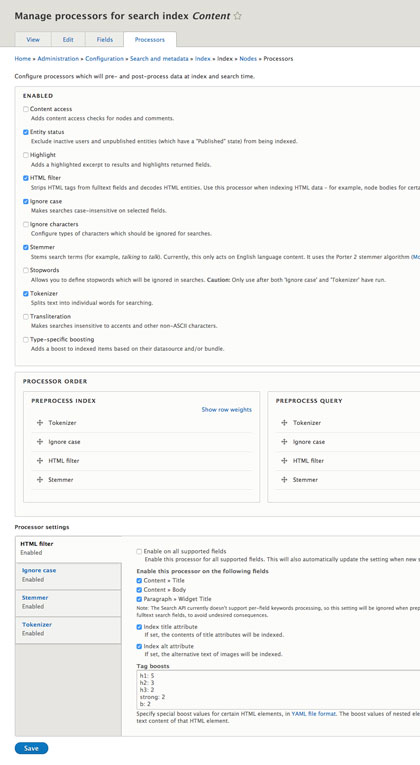
Search API processors work in much the same way as CKEditor's text format filters. You can change data before its indexed to create keyword tokens, ignore case, or filter out certain HTML. You can use a processor to ignore unpublished nodes or take into account Drupal’s node permissions when showing results. You can highlight keywords in the search results (only works if showing a search excerpt in your search results). You can also bring keywords to their English stem, exclude certain words from being indexed and use transliteration for non-English text.
We like to use Entity status to index only published entities, HTML filter to strip tags and decode content that might be in the body field, Ignore case to give the broadest results, Tokenizer so that test strings can be split into single keywords for searching, and Stemmer to trim keywords to their root.
Once you decide which processors make sense for you to use, you’ll have to set their order. Some processors only act at certain times in the indexing/query process and some act at multiple times. Thankfully, Search API does a nice job of letting you know which processors work at which times and even lets you know if a certain processor needs be at certain point in the order to get the best results.
If using the same processors as us, you’ll want to have Tokenizer be first, then Ignore case, HTML filter and Stemmer.
Lastly, you’ll need to configure some of the preprocessors that you chose. Most of them offer options to enable the processor on all supported fields, or just on some. You can define the excerpt and highlighting tag if using Highlight. You can also set the minimum word length for Tokenizer.
We enabled our Tokenizer, HTML filter, Ignore case, and Stemmer processors on all supported fields. Our HTML filter boosts tags with h1 as the most important and each subsequent tag as a lesser value. Tokenizer should be set to the same minimum word length that your Index database configuration is set to—3 for us.
Now that we have the search server and index all setup, the site is ready to start indexing nodes. You'll want to click on the View tab for the index, then click the Index Now button at the bottom to index the site.
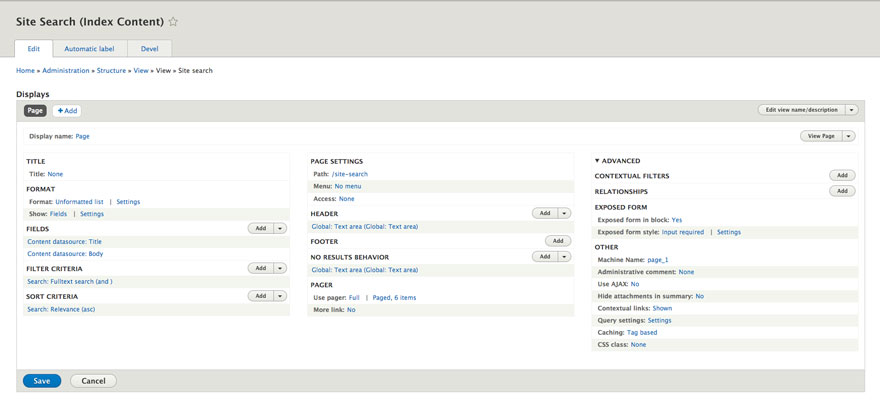
The next thing we need is a way to display search results. For that, we’ll create a custom view page.
Go to /admin/structure/views/add and add a view. We named ours Site Search. Make sure that in the view settings the Show select list is set to Index Content and the box to Create a Page is checked.
Add Fields to Show as the View Results
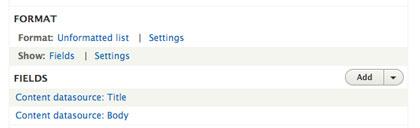
The fields you show in each row of your results are specific to the datasource. For instance, to add the node title, you’d choose Title for the Content datasource. We usually use just the node title and body field for results, but any field on can be added as long as a field on its parent datasource was indexed. For instance you can add a banner image field from a node content type to your results because you indexed the node's title field.
You can filter by more fields than what you are showing so if you have more indexed fields, you can still get a solid keyword search but only show the results field you want—similar to the Drupal core Search excerpt.
We also recommending linking the title to its node, trimming the body field and stripping out HTML tags using the rewrite option for the body field. NOTE: If you are using the highlight processor in your index, you’ll want to use excerpt as the field you want to show. The Highlight processor needs an excerpt to work.
Create Your Custom Search Filters
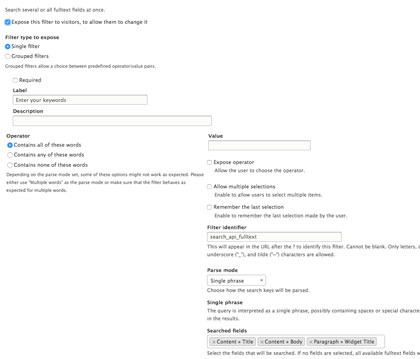
Since we want to use this search in the same ways as Drupal’s core Search, we’ll create the same sort of keyword filter. Remember when we changed all the fields in our index to Fulltext? Guess what filter we are going to use?
The Fulltext search filter performs the same function as Drupal’s core Search filter by searching all of the fields assigned to it at once. This is similar to Views Global Combined filter except that filter reads the view results instead of the search index, so it would not use the query processors outlined in Search API nor the indexed field data. Using a Global Combined filter would return an error instead of search results.
You can set the Fulltext search to work how you want, but we prefer to run it to contain all of the keywords a user puts in and to parse them as a single string. In this way a search for green eggs would return more specific results because the result would have to contain the phrase green eggs rather than just the word green and/or eggs.
For searched fields, set the filter to all of the fields you have set in your index. There is no reason to index fields if you are not going to allow a filter for them (unless you are doing multiple Fulltext Search filters on different fields—for instance, a keyword filter that looks at title and body fields and categories filter rather than looks at a term reference field. The minimum word length should be set to the same minimum word length assigned in your index.
Set Your Sort for the Results
We recommend sorting your results by relevance. If you do so, make sure you choose descending so you get the results with the highest relevance first. You can also sort by any of the fields you added if you want to sort results alphabetically by title or something.
Configure the Rest of the View
We usually use a pager set to 6 for the results and enter some helpful No Results Behavior text for when a user’s keyword string is not found. Set the path to something that makes sense (/search or /site-search).
Most importantly, you want to go to Exposed Form in the Advanced settings section and change Exposed form in block to Yes. This is how you get a search filter block to replace the core Search block we lost when we disabled that module. The Exposed form style should be set to Input required so that a user doesn’t see any results before they have searched for something. We also like to set some helpful Text on demand text in case someone gets to the search page before they have searched for anything. Including a reset button and changing the text for the submit button to ‘Search’ is also good UX.
Pro Tips:
-
Your view must be set to be a view of Index Content in order for it to read the index you just created. Each field you want to show in results must be an indexed field and if you are using the Fulltext search filter, all of your fields in your index must be set to Fulltext.
-
If using the highlight processor, use Excerpt as the field you show for results.
-
If you want global search block, you’ll need to set Exposed form in block to Yes.
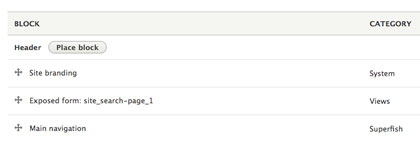
Go to the Block Layout UI (/admin/structure/block) and click Place block on the region you want the block to be assigned to. We’re going to assign ours to the header.
In the list of available blocks, you will see one called Exposed form: my_view_name-my_view_display_name.
Once you choose your filter block, you can configure it like you would any block. For now, let’s leave the configuration as default.
Pro Tips:
-
Since we are replacing the core search block, it's helpful to create a twig template for this block and to assign the same ‘block-search-form-block’ class to the block to preserve some of the theming that was in place from the core block. For more information on creating custom twig template, see our Twig for Drupal 8 Development: Twig Templating Part 1 of 2 post.
-
If you’re creating a custom template for your exposed filter block to add the core class, its very easy to create a search toggle button to show/hide your global search box. Just add your button tag before the block content and use a bit of CSS and JS to show/hide the search input based on a user clicking the toggle icon.
Normally, you cannot get exposed filters on a view page when you have assigned those exposed filters to be in a block. However, we have come up with both a developer and non-developer way to do so. Feel free to use either based on your comfort level with Twig and custom templates.
Either way, the first thing you want to do is go back into the Block Layout admin and configure your global search block to appear everywhere except the search page. Since you are going to add the block to the content of the search page, it doesn’t make sense to have it on the page twice. You can do this by choosing the Pages tab in the block configuration, listing the URL of your search page and choosing to hide for the listed pages.
Exposed Block Without Coding
The non-Twig way to get the exposed filters onto the search page is to use the Block Layout UI to add another instance of your Exposed Filter block to the main content region and restrict it only to your search page. Configure the block exactly as you did the global block, but instead of hiding it on the search page, choose to show it on the list pages.
This method works, but is not as elegant and flexible as using Twig to insert the block directly into a custom Twig template for the view. If you wanted to use a title for the view or use a header above your filter, you would not be able to—the exposed block would always be before the view itself in the main content area of the page.
Insert the Filter Block into the View with Twig

The way we prefer to get the filters onto the view page is to insert them back into the view via Twig. This way, the block can be put exactly where we want and our Block Layout UI is not getting cluttered with a block that is only used on one page.
The first thing we need to do is create a custom template for the view. Unfortunately, in D8 there is no handy theme suggestions helper in the Views UI, so we need to look for it using the inspector. If you have Twig debugging turned on—which you should—you can inspect you search view page and find out that it is using the views-view.html.twig. Make a copy of this and rename it to match your name for the site search view and view display: views-view--my-site-search-view--my-view-display.html.twig.
Once you have your custom view page template, remove the {{ exposed }} filter variable because we’re using a block for the filters. We also like to set a page name in <h1> at the start of the view for SEO and layout consistency reasons. If you use the Title option for the view display through Views UI, it sets it as an H2.
Next we need a method to embed the filter block into the template. We prefer to let the Twig Tweak module do the heavy lifting on this since we already use it for other things.
There are a couple of different ways to embed a block using Twig Tweak, but we prefer the drupal_block() function since it was built specifically for embedding blocks. The key thing to be sure is to turn off Drupal’s native block access checks. Since we told Views to use these exposed filters in block, Drupal will automatically prevent the block from being accessed by the view page template. Unless we turn off that check, all we’ll get is a broken or missing block function. The Twig variable for the filter block embed should look like this: {{ drupal_block('exposedformsite_searchsearch_page', check_access=false) }}. The ‘exposedformmy_search_viewviewpage_display_name’ is the machine name of the block we are embedding and adding the false argument at the end turns of the access checker.

Adam is Director of Development for Electric Citizen and leads the site building process for clients.